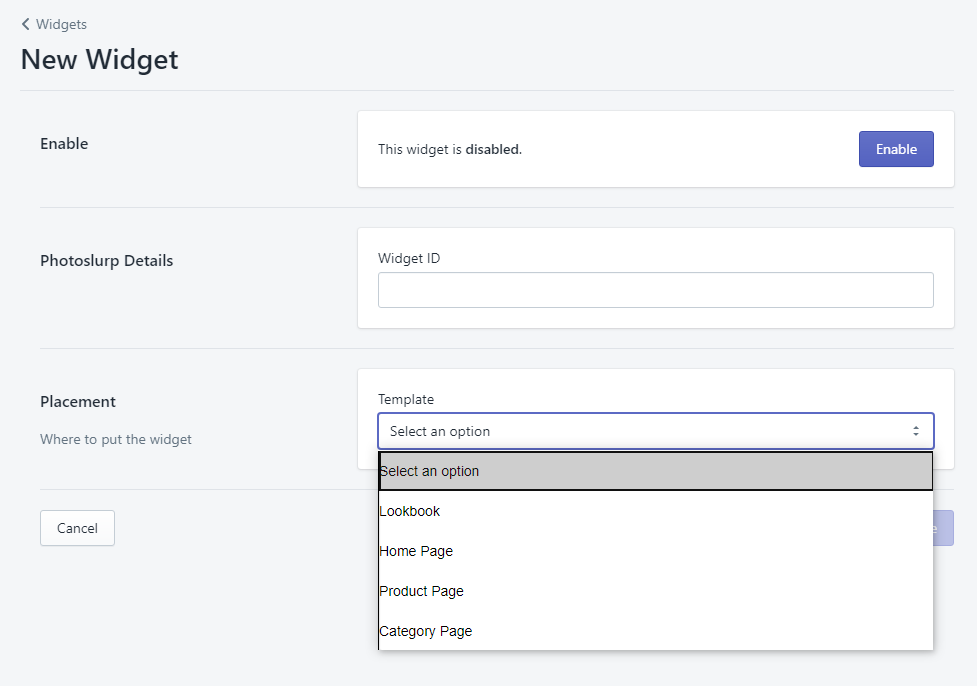
Back in the Photoslurp for Shopify module, head to the 'Widgets' tab and choose to 'Create A New Widget' bringing you to the following screen:

1. Under Widget ID, enter the ID of the widget that you would have previously created with the widget editor in the Photoslurp dashboard.
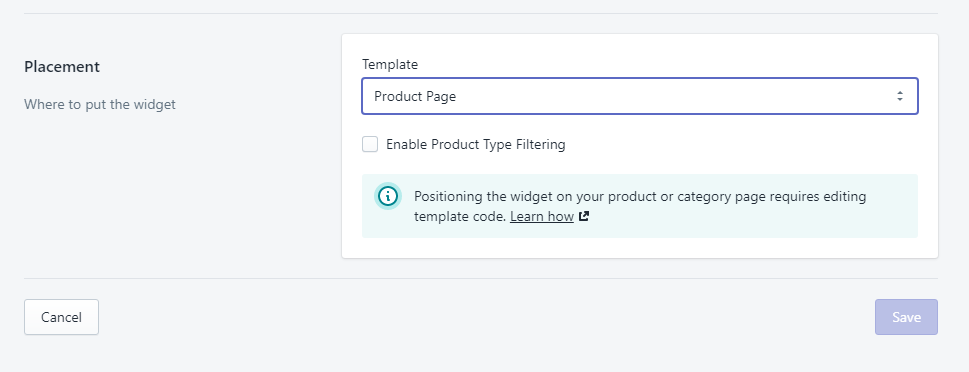
2. Under Placement, choose the location of where you would like this widget to appear.
3. Make sure you click on the 'Enable' button before clicking Save.
A. Homepage Widget
Online Store -> Themes -> Customize
Click to 'Add section', where you will find a section named 'Photoslurp' with the homepage widget you have created right under it.

Once you've clicked to 'Add' the section, you can then move it around the homepage to position the widget wherever you like.
B. Product Page Widget
When you select the Product Widget option, a checkbox will appear allowing you to Enable Product Type Filtering. Doing so will allow the widget to display pictures of other products that belong to the same Product Type of the product showcased in the page, right after the pictures of the product itself.

After creating a product page widget within the Shopify module, head to Online Store -> Themes -> Actions -> Edit Code.
Here you are looking for your product page template file which for the default theme can be found under Sections -> product-template.liquid. Search for the position within your product page that you would like to have the widget show up and enter the following code on a separate line:
{% render 'photoslurp-product' %}
If you have created more than one product page widget a sequential number would have been added to this snippet name which can be seen in the widget list page of the Photoslurp Shopify module as can be seen below:

We highly recommend positioning the product page widget as close to the main product images as possible to ensure it's maximum exposure.
C. Lookbook Widget
The Lookbook widget is the easiest one of all to setup. Set the widget ID, choose the Lookbook template under 'Placement' and click Save. A new page will be created under https://yourdomain.com/pages/lookbook containing the widget ID you specified.
D. Category Widget
After creating a category page widget within the Shopify module, head to Online Store -> Themes -> Actions -> Edit Code.
Here you are looking for your collection page template file which for the default theme can be found under Sections -> collection-page-template.liquid. Search for the position within your category page that you would like to have the widget show up and enter the following code on a separate line:
{% render 'photoslurp-category' %}
If you have created more than one product page widget a sequential number would have been added to this snippet name which can be seen in the widget list page of the Photoslurp Shopify module.